No Need for Astro or mdsvex. I Built a Static Blog Only Using SvelteKit
Published on
I just spent a couple hours porting this blog from Astro to SvelteKit.
Why ?
If you're happy with Astro, I'm not here to change your mind. But I genuinly think that SvelteKit is the better framework for content websites like this blog. I know the number of lines of code isn't always an indicator of code quality but I can't help but ogle at the fact that porting the same website with the exact same features from Astro to SvelteKit resulted in almost 50% less lines of code. Basically, Svelte allows you to do everything Astro does (and more) while writing way less code. Here's the migration PR to prove it.
The resulting build (including assets) in both frameworks was around 12mb. SvelteKit somehow improved my lighthouse score from 80s and 90s to 100s across the board. I suspect it has to do with Astro's islands not being as lightweight as advertized.
I also think that moving to SvelteKit will give me more flexibility in case I wanted to add more dynamic capabilities to my website in the future.
Now allow me to show you how simple it is to build a static blog in SvelteKit.
How ?
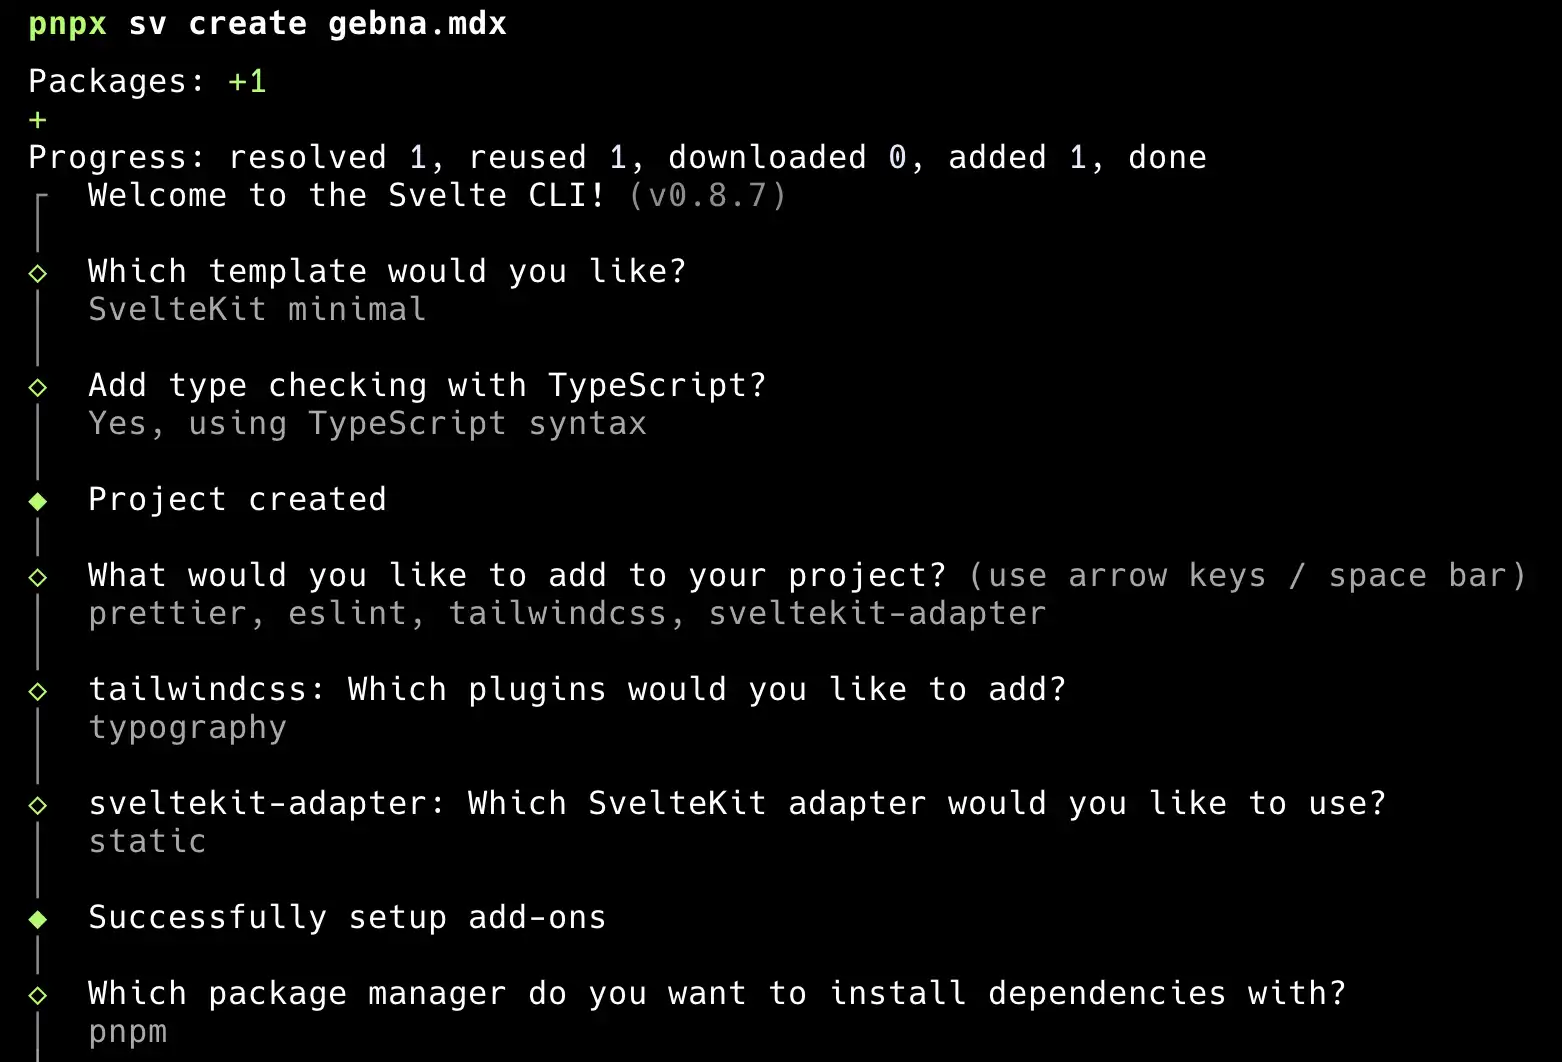
1- Initialize a SvelteKit project
pnpx sv create your-blog-nameWhen prompted pick the static adapter, choose to install tailwind and tailwindcss/typography plugin. Feel free to install prettier and eslint as well. Here are my picks:
To statically build all pages we also need to add a +layout.server.ts file in the root:
export const prerender = true;2- Install the tools required to parse your markdown and convert it into HTML for Svelte to render.
pnpm add -D gray-matter unified remark-rehype remark-parse rehype-stringify rehype-slug rehype-autolink-headings rehype-pretty-code @rehype-pretty/transformers valibot3- Move your md/mdx files to /src/content/blog/
4- Create a content.ts file in src/lib
export const blogPosts = import.meta.glob('/src/content/blog/*.mdx', {
query: '?raw',
import: 'default',
eager: true,
});Here we're using Vite's glob import to get an object (Record) that contains the content of the markdown files in src/content/blog.
5- We want the home page of the app to have a list of all blog posts showing titles and publish dates. But how do we get a post's metadata ?
Here's how we need our markdown files to look like:
---
title: Title Here
description: Description Here
pubDate: '2025-05-29'
---
The actual markdown goes here...As you can see, we're using Frontmatter to add metadata to the markdown. We're also going to use the name of the markdown file as an id or a slug. Let's implement a function that takes the record of files from the glob import and gives us an array of blog posts metadata.
import matter from 'gray-matter';
import * as v from 'valibot';
import { BASE_URL } from './constants';
export const blogPosts = import.meta.glob('/src/content/blog/*.mdx', {
query: '?raw',
import: 'default',
eager: true,
});
export const blogPostMetadataSchema = v.object({
id: v.pipe(v.string(), v.trim()),
title: v.pipe(v.string(), v.trim()),
description: v.pipe(v.string(), v.trim()),
pubDate: v.pipe(
v.string(),
v.transform((i) => new Date(i)),
v.date()
),
});
export function getBlogPostsMetadata() {
const posts = Object.entries(blogPosts)
.map(([filePath, rawContent]) => {
const { data } = matter(rawContent);
const id = filePath
.split('/')
.pop()
?.replace(/\.mdx$/, '') as string;
const post = v.parse(blogPostMetadataSchema, {
id,
...data,
});
const canonicalURL = new URL(`/blog/${post.id}`, BASE_URL).toString();
const relativeURL = `/blog/${post.id}`;
const ogImage = `/content/${post.id}/og.jpg`;
const heroImage = `/content/${post.id}/hero.webp`;
return { ...post, canonicalURL, relativeURL, ogImage, heroImage };
})
.sort((a, b) => b.pubDate.valueOf() - a.pubDate.valueOf());
return posts;
}In getBlogPostsMetadata:
- We map over each markdown file
- Use gray-matter to extract the metadata
- Use the metadata validation schema we defined using Valibot.
v.parsewill throw if any markdown file violates the schema - We also add some useful properties like canonicalURL, relativeURL, ogImage, and heroImage to the metadata object. Here we're assuming that these image files exist in
static/content/**post_id**/. This convention will save us from having to manually input the hero image path of every post. - Finally, we sort the array by pubDate so that the most recent posts appear first.
6- The home page is where we'll list our posts:
import { getBlogPostsMetadata } from '$lib/content';
import type { PageServerLoad } from './$types';
export const load: PageServerLoad = () => {
const posts = getBlogPostsMetadata();
return { posts };
};<script lang="ts">
import type { PageProps } from './$types';
let { data }: PageProps = $props();
</script>
{#each data.posts as post (post.id)}
<a class="card bg-base-100 group w-sm shadow-sm" href={post.relativeURL}>
<figure>
<img
class="h-64 w-sm scale-100 object-cover duration-100 ease-in group-hover:scale-105"
src={post.heroImage}
alt={post.title}
/>
</figure>
<div class="card-body">
<time datetime={post.pubDate.toISOString()}>
{post.pubDate.toLocaleDateString('en-us', {
year: 'numeric',
month: 'short',
day: 'numeric',
})}
</time>
<h2 class="card-title">{post.title}</h2>
</div>
</a>
{/each}In addition to Tailwind, I'm using DaisyUI for styling. But it's up to your preference. You can see this list in action here.
7- Let's create the page for an individual post
import { error } from '@sveltejs/kit';
import matter from 'gray-matter';
import rehypeStringify from 'rehype-stringify';
import remarkParse from 'remark-parse';
import remarkRehype from 'remark-rehype';
import { unified } from 'unified';
import { blogPosts, getMetadataFromMatter } from '$lib/content';
import type { PageServerLoad } from './$types';
export const load: PageServerLoad = async ({ params }) => {
const matchPath = `/src/content/blog/${params.id}.mdx`;
const rawContent = blogPosts[matchPath];
if (!rawContent) return error(404);
const { content, data } = matter(rawContent);
const postMetaData = getMetadataFromMatter(params.id, data);
const contentHTML = (
await unified()
.use(remarkParse)
.use(remarkRehype, { allowDangerousHtml: true })
.use(rehypeStringify, { allowDangerousHtml: true })
.process(content)
).toString();
return {
...postMetaData,
contentHTML,
};
};Let's break it down:
- Get the raw content of the
mdxfile using the url parameter - Return a 404 error if we don't find a file
- Use gray-matter to get the content and metadata of the mdx file
- Validate the metadata using
getMetadataFromMatter. It's the same steps we took when making the list of posts metadata. - Create a unified processor to convert our markdown content to HTML.
{ allowDangerousHtml: true }enables us to use HTML elements in our markdown. This is useful when you want to embed a Youtube video iframe in your post for example.
<script lang="ts">
import type { PageProps } from './$types';
let { data }: PageProps = $props();
</script>
<article class="prose prose-lg mx-auto p-4">
{@html data.contentHTML}
</article>There two very important things here:
- We use Svelte's @html syntax to render the markdown content we just converted.
- We're using the
proseutility class provided by the tailwind typography plugin. Because we wouldn't want to style everything individually. These classes will add typographic styling to all the HTML that we have no control over.
8- Section links, Syntax Highlighting, and more
One of the super powers we get by using unified is that we're able to use the rich ecosystem of plugins it supports. In this blog, I'm using 4 plugins:
import { transformerCopyButton } from '@rehype-pretty/transformers';
import { error } from '@sveltejs/kit';
import matter from 'gray-matter';
import rehypeAutolinkHeadings from 'rehype-autolink-headings';
import rehypePrettyCode from 'rehype-pretty-code';
import rehypeSlug from 'rehype-slug';
import rehypeStringify from 'rehype-stringify';
import remarkParse from 'remark-parse';
import remarkRehype from 'remark-rehype';
import { unified } from 'unified';
import { blogPosts, CONTENT_BASE_PATH, getMetadataFromMatter } from '$lib/content';
import type { PageServerLoad } from './$types';
export const load: PageServerLoad = async ({ params }) => {
const matchPath = `${CONTENT_BASE_PATH}/${params.id}.mdx`;
const rawContent = blogPosts[matchPath];
if (!rawContent) return error(404);
const { content, data } = matter(rawContent);
const postMetaData = getMetadataFromMatter(params.id, data);
const contentHTML = (
await unified()
.use(remarkParse)
.use(remarkRehype, { allowDangerousHtml: true })
.use(rehypeStringify, { allowDangerousHtml: true })
.use(rehypeSlug)
.use(rehypeAutolinkHeadings, { behavior: 'wrap', properties: { className: ['link-hover'] } })
.use(rehypePrettyCode, {
theme: 'github-dark',
transformers: [
transformerCopyButton({
visibility: 'hover',
feedbackDuration: 3_000,
}),
],
})
.process(content)
).toString();
return {
...postMetaData,
contentHTML,
};
};rehype-sluggives an html id attribute to all the heading elements in a post. (h1, h2, ...)rehype-autolink-headingswraps these headers in an anchor tag. Allowing us to link to specific sections in a page.rehype-pretty-codesuper charges our code blocks with beautiful and context aware syntax highlighting. I showcased some of its capabilities in a previous post.@rehype-pretty/transformersgives us a dead simple "Copy" button whenver a reader hovers over a code block.rehype-pretty-codeis unstyled. All it does is add some html data attributes to our code. We can target these data attributes and style them using tailwind:
@import 'tailwindcss';
@plugin '@tailwindcss/typography';
@plugin "daisyui" {
themes: business;
}
:root {
color-scheme: dark;
}
body {
@apply flex min-h-screen flex-col bg-zinc-900 text-zinc-100;
-webkit-font-smoothing: antialiased;
-moz-osx-font-smoothing: grayscale;
}
.prose {
@apply max-w-4xl !leading-7 sm:text-lg sm:!leading-9 md:text-xl;
h1 {
font-weight: 700;
font-size: 2.25rem;
}
h2 {
font-weight: 700;
font-size: 1.875rem;
}
h3 {
font-weight: 700;
font-size: 1.25rem;
}
h4 {
font-weight: 700;
font-size: 1rem;
}
h5 {
font-weight: 700;
font-size: 0.75rem;
}
h6 {
font-weight: 700;
font-size: 0.875rem;
}
h3 code {
@apply !text-lg md:!text-xl;
}
pre {
@apply rounded-lg !px-0;
}
code {
@apply text-sm !leading-loose md:text-base;
}
pre > code {
counter-reset: line;
}
code[data-theme*=' '],
code[data-theme*=' '] span {
color: var(--shiki-light);
background-color: var(--shiki-light-bg);
}
@media (prefers-color-scheme: dark) {
code[data-theme*=' '],
code[data-theme*=' '] span {
color: var(--shiki-dark);
background-color: var(--shiki-dark-bg);
}
}
code[data-line-numbers] {
counter-reset: line;
}
code[data-line-numbers] > [data-line]::before {
counter-increment: line;
content: counter(line);
@apply mr-4 inline-block w-4 text-right text-gray-500;
}
pre [data-line] {
@apply border-l-2 border-l-transparent px-4;
}
[data-highlighted-line] {
background: rgba(200, 200, 255, 0.1);
@apply border-l-blue-400;
}
[data-highlighted-chars] {
@apply rounded bg-zinc-600/50;
box-shadow: 0 0 0 4px rgb(82 82 91 / 0.5);
}
[data-chars-id] {
@apply border-b-2 p-1 shadow-none;
}
[data-chars-id] span {
@apply !text-inherit;
}
[data-chars-id='v'] {
@apply border-b-pink-600 bg-rose-800/50 font-bold !text-pink-300;
}
[data-chars-id='s'] {
@apply border-b-yellow-600 bg-yellow-800/50 font-bold !text-yellow-300;
}
[data-chars-id='i'] {
@apply border-b-purple-600 bg-purple-800/50 font-bold !text-purple-200;
}
[data-rehype-pretty-code-title] {
@apply rounded-t-lg bg-zinc-700 px-3 py-2 text-sm font-semibold text-zinc-200;
}
figcaption + pre {
@apply !rounded-t-none;
}
figure {
@apply mt-1 mb-6;
}
pre,
code,
figure {
@apply overflow-x-auto px-2 py-1;
}
p {
@apply text-xl;
}
}Feel free to copy this. And change it to your liking. As you can see, we're only applying these overrides in elements that are children of .prose. This means we're not contaminating the rest of our app with these global overrides and only styling the generated HTML.
9- The build
We're almost done. Let's make sure our code builds:
pnpm buildIn my case the build failed becuase some of my markdown files had relative links to pages that didn't exist. Once I removed these links the build succeeded.
10- Sitemaps and Robots
To allow search engines like Google or Brave to index our blog. We need a sitemap.xml file.
pnpm add -D fast-xml-parserimport { XMLBuilder } from 'fast-xml-parser';
import { BASE_URL } from '$lib/constants';
import { getBlogPostsMetadata } from '$lib/content';
import type { RequestHandler } from './$types';
export const prerender = true;
export const GET: RequestHandler = async () => {
const posts = getBlogPostsMetadata();
const sitemapObject = {
urlset: {
'@_xmlns': 'http://www.sitemaps.org/schemas/sitemap/0.9',
'@_xmlns:xhtml': 'https://www.w3.org/1999/xhtml',
'@_xmlns:mobile': 'https://www.google.com/schemas/sitemap-mobile/1.0',
'@_xmlns:news': 'https://www.google.com/schemas/sitemap-news/0.9',
'@_xmlns:image': 'https://www.google.com/schemas/sitemap-image/1.1',
'@_xmlns:video': 'https://www.google.com/schemas/sitemap-video/1.1',
url: [
// Here we put all the static pages. The home page and the support page in my case
{ loc: BASE_URL, lastmod: new Date() },
{ loc: `${BASE_URL}support`, lastmod: new Date() },
].concat(
// Here map over the array of blog posts.
posts.map((post) => ({
loc: post.canonicalURL,
lastmod: post.pubDate,
}))
),
},
};
const builder = new XMLBuilder({
ignoreAttributes: false,
format: true,
});
const sitemapXml = builder.build(sitemapObject);
return new Response(sitemapXml, {
headers: {
'Content-Type': 'application/xml',
},
});
};Here we create a prerendable GET endpoint so that our build will have a sitemap.xml file that we can reference.
How can search engines know where to look for our sitemap.xml file? We need a robots.txt file. This is a simple static file that we put in our static folder:
User-agent: *
Allow: /
Sitemap: https://gebna.gg/sitemap.xml11- The <head> tag
In addition to the sitemap, every page in our website must provide information like title, description, or Open Graph image. All this information is in the <head> tag of every page. Svelte allows us to insert stuff into the head tag using the <svelte:head> element. Using that let's create a resuable head component:
<script lang="ts">
import { BASE_URL } from '$lib/constants';
interface Props {
title: string;
description: string;
pathname: string;
imagePath?: string;
}
let { title, description, pathname, imagePath }: Props = $props();
const canonicalURL = new URL(pathname, BASE_URL).toString();
const imageURL = imagePath && new URL(imagePath, BASE_URL).toString();
</script>
<svelte:head>
<link rel="sitemap" href="/sitemap.xml" />
<link rel="canonical" href={canonicalURL} />
<title>{title}</title>
<meta name="title" content={title} />
<meta name="description" content={description} />
<meta property="og:type" content="website" />
<meta property="og:url" content={canonicalURL} />
<meta property="og:title" content={title} />
<meta property="og:description" content={description} />
<meta property="og:image" content={imageURL} />
<meta property="twitter:card" content="summary_large_image" />
<meta property="twitter:url" content={canonicalURL} />
<meta property="twitter:title" content={title} />
<meta property="twitter:description" content={description} />
<meta property="twitter:image" content={imageURL} />
</svelte:head>Let's use this component in our Home page and our individual post page:
<script lang="ts">
import Head from '$lib/components/Head.svelte';
import { DEFAULT_DESCRIPTION, DEFAULT_TITLE } from '$lib/constants';
import type { PageProps } from './$types';
let { data }: PageProps = $props();
</script>
<Head
title={DEFAULT_TITLE}
description={DEFAULT_DESCRIPTION}
pathname="/"
imagePath="/avatar.webp"
/><script lang="ts">
import Head from '$lib/components/Head.svelte';
import type { PageProps } from './$types';
let { data }: PageProps = $props();
</script>
<Head
title={data.title}
description={data.description}
pathname={data.relativeURL}
imagePath={data.ogImage}
/>12- Optional: RSS
We can implement an rss.xml endpoint in the same way we implemented sitemap.xml:
import { XMLBuilder } from 'fast-xml-parser';
import { BASE_URL, DEFAULT_DESCRIPTION, DEFAULT_TITLE } from '$lib/constants';
import { getBlogPostsMetadata } from '$lib/content';
import type { RequestHandler } from './$types';
export const prerender = true;
export const GET: RequestHandler = async () => {
const posts = getBlogPostsMetadata().slice(0, 15);
const rssObject = {
rss: {
'@_version': '2.0',
'@_xmlns:atom': 'http://www.w3.org/2005/Atom',
channel: {
title: DEFAULT_TITLE,
link: BASE_URL,
description: DEFAULT_DESCRIPTION,
language: 'en-us',
pubDate: new Date().toUTCString(),
'atom:link': {
'@_href': `${BASE_URL}rss.xml`,
'@_rel': 'self',
'@_type': 'application/rss+xml',
},
item: posts.map((post) => ({
title: post.title,
link: post.canonicalURL,
guid: post.canonicalURL,
description: post.description,
pubDate: post.pubDate.toUTCString(),
})),
},
},
};
const builder = new XMLBuilder({
ignoreAttributes: false,
format: true,
});
const rssXml = builder.build(rssObject);
return new Response(rssXml, {
headers: {
'Content-Type': 'application/xml',
},
});
};Pay attention to the highlighted line. Becuase the RSS standard doesn't allow for more than 15 items in a feed, we're only getting the 15 most recent posts.
Results
This blog. Yes, the one you're reading rightnow, is completely open source. You can read the complete code yourself on GitHub. Feel free to fork it or just copy the code into your project if you want. Enjoy ✌️ 🍉
If you want me to review your plan or code before you commit, send it over